Saturday 30 November 2013

Really good video on female representation in video games

http://m.youtube.com/watch?v=X6p5AZp7r_Q

So from now I will be posting everything from the internet I like and enjoy about video games. Will be saved in non-work tag.

Gamer issues

Friday 15 November 2013

Week 6 - Surrealism


This Week's Brief was Surrealism

We could take the end result in any direction and by any medium. The requirements, show 8.5 Hours of work, develop your art skills and display your creative process.


Mood Board:    


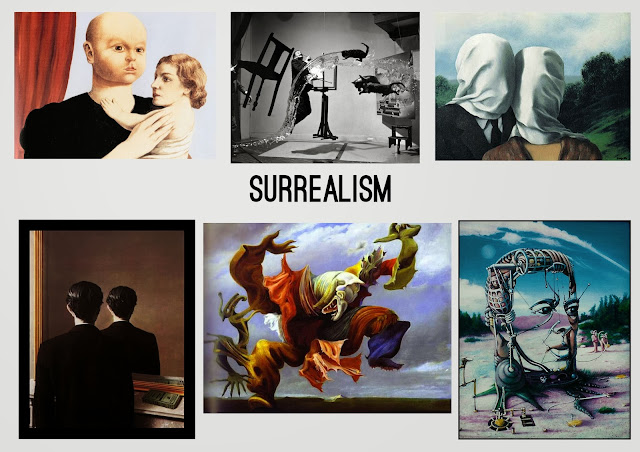
So I was really interested by the 3D models, and crossed with nature and this theme of identity.
I started with the Ivy Plugin for Max, taking the head mesh from Mudbox I placed in 3Ds Max.
I placed the head on its side, and placed the seed inside in the nose.


It took a while trying different scales and settings on the Ivy modifier to get it to grow slowly (600 years old)
and fill the right space.


I took a render in 3Ds Max of the head mesh to get correct lighting and shadows (I had two direction lights and an omni light). I cut this in Photoshop and placed it as an overlay layer to add more shadow and highlights to the ivy, and make it look more like a human head.


I took a background image of a lake and reflected it by copying and pasting one side then flipping it over


Final Image:


I thought the render images where more interesting and effective than my final piece


Thursday 7 November 2013

Week 6 - Games Mechanic

Group Work this week: Lights Update: Finished/ Final Adjustments

Pool Table Light - Finished Remove Cables as separate object so they aren't turned to chrome

Dome Light - Finished Create Cookie Light Map

Decals and Wall Planes

Cylinder Light -

Hanging Cylinder


Things I learnt:

Smoothing Groups, I did practice this before but didn't really grasp what was happening. I learnt how to use smoothing groups and how they adjust the Polygons normals. Very useful for creating low poly lights which look smooth and cylindrical.

Cookies In unity: Is a Mask for the projection of Lights, Works like an alpha channel. Take the grey scale texture map.

Scale Tool in 3Ds Max doesn't scale measurements of object, just warps it.

Scaling In Photoshop, Decreasing the size of textures using smart objects Tga size from 24>12 Bit and Colour 16>8 Bit and decreasing to 256 without losing any quality!

Week 5 - "Candle" Light Building


My objective for this week was to model and texture all the lights for the Student Union recfortary, so they could be placed in the Unity model and lit.

Up First was:

Candle Light: Diameter = 41, H = 41 or 28 for main glass bit


So I Started off Modelling, I used to squares in the right dimensions to get my dome to the right height with the soft select and snap tools.


I added more detail, however increased the polygon count to much

Also made the mistake of making the top cylinder out of another object, so for my second model I extrude the top cylinder, which is better for topology and polygon count.

I also used quite a lot of polygons ineffectively without much detail


Thursday 24 October 2013

Week 3-4 SpaceShip Science Fiction

Spaceship design, we where granted two weeks to design and model a Science Fiction space ship. 

I started drawing some sketches for a medieval themed ship for a mythic science fiction ship, I liked the idea of a massive cruiser with metal cladding and chain mail. 

Sketched ideas - Basic 3D models

I struggled drawing the size of the object and adding small details to keep it interesting.
Inspired by friends in my class and their work creating small personal spaceships, i started redrawing some sketches inspired by classic cars. 

I had this curved shape in my mind inspired by 

Classic Jaguar D Type

Pod Racers 

Morgan Aero

After sketch some quick ideas I built a simple 3D model which I then printed out and draw in some softer curves and refined the shape with the help of 3D model for perspective. 

 I then took the drawing back into 3Ds Max to model it.

The brief asked for the the ship have mechanical design, which i struggled to do with a large space ship as it only need a propulsion system due to the nature of space.

Meaning it i was more personal transport ship on earth meant could practice my 3D modelling skills to real life elements.

I first modelled the left turbine engine


Revisited:

First I changed the caboose changing the shape and adding so flare

Then I unwrapped the model with RoadKill as the model is very organic. The model also has a lot of topology so made the process more difficult.


I then texture the Uv's in photoshop using selection tool, layer fx and color fills.

I added outline to split the design into sections. This required using a lot of selection and refine selection tools as to get a nice edge.
Caboose:

Diffuse:


Then using marmoset skyshop and its inbuilt shaders. Got to really grips with the software and its power create beautiful images and turntables. A thank you to Ed, who helped me to learn marmoset and design tips.


Turntable video on my Vimeo